Tuesday, December 30, 2008

Plastic Pipe Presents Problems


Polybutylene pipe seems to be on many homeowners’ minds lately, judging by the number of questions I receive about it. Since the questions vary widely, I’ll address the most frequently asked ones here.
What is Polybutylene pipe? It is a form of plastic resin that was used extensively in water supply piping from 1978 until 1995. Due to the low cost of the material and ease of installation, polybutylene piping systems were called "the pipe of the future" and were used as a substitute for traditional copper piping.
It is most commonly found in the "Sun Belt" where residential construction was heavy through the 1980's and early-to-mid 90's, but it is also very common in the Mid Atlantic and Pacific Northwest states. The piping was used for underground water mains and interior water supply piping. It was used in approximately 6 million homes.
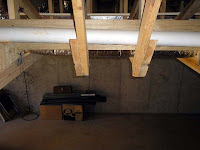
How can you tell if you have polybutylene pipes? Polybutylene inside your home can be found near the water heater, in basements, crawl spaces, and coming out of walls and floors to feed sinks and toilets. Copper pipes feeding sinks or other fixtures do not rule out the use of polybutylene. Some plumbers used polybutylene throughout the house, but installed short pieces of copper where the pipes come out of the wall and floors.
The most common polybutylene for the interior is gray in color, and the joint connectors look like a plain wedding band. Polybutylene used under ground to bring water to your house is generally blue, but may be gray or black. If it has “PB” on it, then it is polybutylene. Good places to look for exterior polybutylene are at your main shut-off and at your water meter.
What are the problems with polybutylene pipe? Reports indicate that the chlorine in treated water will cause the polybutylene to become brittle; under pressure it will split apart. Polybutylene pipes can leak at anytime, destroying you home and its contents. The problem is there is no warning or a way to tell or predict that the pipe is nearing the time it will fail. It is not possible for a home inspector or a plumber to determine if the polybutylene is about to fail by looking at the outside of the pipe. The deterioration starts from the inside of the pipe, so no evidence is visible from the outside. Failure can happen suddenly without warning.
To date, lawsuits are still outstanding, and class action settlement dollars are pending. To find out more, go to http://www.pbpipe.com/.
The bottom line is that this pipe is known to be a problem. If you have it in your house, you need to know about it. To have this pipe replaced with copper costs about the same as re-carpeting, or a re-roofing. If you are buying a house that has polybutylene, don’t let the fact stop you from buying the house; these things can usually be negotiated to both parties’ advantage.
If you are still not sure if you have polybutylene, call a home inspector.
Remember, for your protection, get a home inspection.

Monday, December 29, 2008

Cure for the common cold


‘Most of us have something in common this time of year; yes, it's cold weather. Cold weather can be detrimental to our homes, if we are not prepared. We cannot stop the cold from visiting, but we can prepare some cures to prevent costly repairs and discomfort of this common cold.

Recently, I experienced a cold weather disaster to my rental property. When I talked to my insurance agent I was surprised to find out the extent that cold weather has on costly repairs. My agent told me that it is not unlikely to have cold weather related insurance losses mount to over a billion dollars a year.

In my case, I found out the hard way that during severe cold, your house temperature should not fall below sixty-two degrees, even when no one is home. The exterior walls of your house are commonplace to house water pipes. To keep the pipes from freezing inside the walls, you must maintain at least a temperature of sixty-two or sixty-five depending how severe the cold gets in your area. Pipes that freeze usually burst. This is not good. I know too well. It is a good idea to check for water pipes that are exposed near exterior walls in basements or crawl spaces. These pipes should be insulated; this is an inexpensive cure for a costly problem.

Roof and gutter damage are also major contributors to insurance losses and costly repairs to homeowners. Excessive snow and ice build up can tear off gutters and cause roofs to leak or even collapse. We cannot prevent all problems and catastrophic disasters. But here are some ways to help cure the “common cold" problems:

Ø Keep trees trimmed back at least ten feet from the roof
Ø Keep gutters attached properly
Ø Keep gutters cleaned
Ø Make sure that downspouts are properly attached and free of debris
Ø Keep attic vents clear (well vented attics will help protect your roof from damage due to “ice damming”)
Ø Make sure that the insulation in your attic is adequate for your climate (this will also help protect your roof from “ice damming”)

Take some time to learn what steps you can take to prevent damage to your house. Preventive maintenance is the best way to save you money on costly repairs. With house repairs, you pay now or later. I found that now saves you money over later.

Now is the time to protect your house from”The Common Cold”.

Friday, December 19, 2008

Safe Holidays are Happy Holidays


Every year we hear of household accidents taking lives around the holiday season. To keep the holiday season a happy season we need to practice safety awareness. The simple fact is this season brings an increased use of electricity, candles, fireplaces, extension cords, live trees indoors, and holiday lights both in and out doors, all of which can increase the risk of fire.
With the holidays approaching, excitement fills the air with the anticipation of lots of food, lots of new toys, and seeing the family members that you only see on special occasions. To ensure the holidays are truly a wondrous event here are some tips to keep you and your family safe:

 Test your smoke detectors
 Test your carbon monoxide detector—if you do not have one, get one- it is worth it
 Check to make sure your fire extinguisher is operable and easy to get to
 Do not leave burning candles unattended
 Dispose of fireplace ashes outside and in a metal container
 After guests have left, take all trashcans outside—in case sparks or a cigarette may have gotten in
 Use indoor extension cords indoors only
 Use only outdoor lights outside your home
 Connect no more than three strands of lights together
 When connecting outdoor light strings together, cover the connections with plastic or something to keep out moisture
 Read the warning labels on decorative lights and follow them
 Check to make sure that all light strings are in good condition
 Unplug light strings before replacing the bulbs
 Do not overload electrical outlets
 Use only UL-approved lights

Remember if you are entertaining guests that smoke, provide plenty of ashtrays, check for cigarettes left burning, and again remember to remove all waste-cans before going to bed.

If you have a live tree in your house for the holidays, here are some tips for you:

 Do not purchase a tree that already has the needles falling off
 Trim a couple of inches off the bottom of the tree just before you put it in water- this will help it absorb water
 Locate the tree away from fireplaces and heat sources
 Water the tree regularly
 Use low voltage bulbs or “twinkle” type bulbs- these types of bulbs generate less heat
 Never use candles, even on artificial trees
 If you use a metallic tree, do not use electric lights on it
 Turn off lights before going to bed

After the holiday season, when it is time to dispose of the tree, you can call your local sanitation office to see what provisions they provide for disposal, but for safety’s sake never burn it in your fireplace.

If you have that hard-to-shop-for person on your gift list, or just want to give someone you love that gift of safety, here are some gift ideas:

 Smoke detectors
 A fire extinguisher
 A carbon monoxide detector
 Flashlight and batteries
 A first aid kit

We all are aware of the danger of fire and smoke and most of us have smoke detectors, and most of us check the batteries. But what about “The silent killer” carbon monoxide. Carbon monoxide is generated through incomplete combustion of fuel such as natural gas, propane, heating oil, kerosene, coal, and charcoal, gasoline or wood. This incomplete combustion can occur in a variety of home appliances. The major cause of high levels of carbon monoxide in the home is faulty ventilation of funaces, hot water heaters, fireplaces, cooking stoves, grills and kerosene heaters.
Faulty or improper ventilation of natural gas and fuel oil furnaces during the cold winter months accounts for most carbon monoxide poisoning cases.
Carbon monoxide (CO) detectors are affordable and easy to install, and in my opinion a must for every home.

Youth groups often sell these items to raise money during the holiday season, so they are easy to find.

Remember the first step to keep your family safe begins with keeping your house safe!!!!

“The very best of holiday wishes to you and yours from all of us”


Tuesday, November 25, 2008

Unwanted Guest

Home Inspectors can get some strange questions, for example:

Question: I have a guest living in my home and he doesn't pay rent, he tears up the place and he comes and goes as he pleases. I have a squirrel in my attic. I have tried to catch the little guy many times and I am embarrassed to say that he has outsmarted me at every turn. I thought it to be fun at firstbut I swear I heard him in one of our walls the other day and I amconcerned that he could bite into something that he should not. Should I beworried and what kind of damage can one squirrel do?


Answer: There has been a lot of success using an ultrasonic rodent repeller. These ultrasonic rodent repellers create sound patterns that the pest don’t like, and they will leave. These devices start around thirty dollars. It is best to purchase one that has a money back guarantee.

The main problem is to find the opening in your house they are using to get in. I recommend looking around the eaves and soffits for openings. Once you have evicted your unwanted guest it is time to seal these openings.

Monday, November 24, 2008

Stonewall Heading South

One concern of any home inspector is water control around foundations or any subterranean wall. The combination of soil and water against a wall can cause hydrostatic pressure that will cause the wall to implode. The main defense is proper water control. Retaining walls much like a foundation wall is a wall that holds soil in its place.

Here is a typical question I receive on this subject.

Question: We just moved into a wonderful cape cod that was built in the 1950's. We love the home, but we have a retaining stonewall on the side of our drive and it appears to be leaning inwards. It looks like there was some patchwork in the past (new concrete). How worried should I be and should I just pay to have a new wall built? Answer: Retaining walls over the years will start to lean inwards because of hydrostatic pressure. This is caused by poor grading on the high side of the wall, and also poor draining at the bottom of the wall. If the wall is leaning in slightly, with proper maintained and drainage the wall can still perform for many more years.
For proper grating at the top of the wall, the dirt should be higher against the wall and sloping down away from the wall. This will help stop water pressure against the wall. You should find drain holes (scuppers) at the bottom base of the wall, removing dirt and debris from these holes will help with drainage. This will also help prevent water pressure against the wall.
Perform these maintenance tips and monitor the wall movement.
If the wall keeps moving, there are other cures besides removing and rebuilding the wall. One such method is to install soil anchors. Soil anchors are rods that go through the wall and under the soil, and are anchored in the soil. There are plates on the open side of the wall that the rods pass through. The rods are treaded and have nuts on the end, by tightening the nuts the wall is pulled back into place, and is held there by the soil anchors.

Friday, November 21, 2008

The All Important Roof Flashing


Any home inspector can tell you the important role roof flashing plays in avoiding costly leaks. Using the proper flashing in its proper place a good start, but keeping it in good repair will avoid costly repairs to the interior of your house. Inspecting the flashing from the exterior is a good start, but the real story is revealed from the interior of the attic. For example, valley-pan flashing can appear in good condition from the surface, but that is only part of the story. The way it was installed is not apparent from the surface, and improper installation will cause leaks that can only be detected from the underside of the roof.

Here is an example of questions I receive about roof flashing.
Question: We recently had some roof work, including the installation of drip edge. Could you tell me the purpose(s) of a roofing drip edge? Could you also tell me the proper location of a drip edge in relation to a gutter? (I fear that I may have had one installed incorrectly.)


Answer: Of all of the different types of flashing, drip edge flashing is the simplest. Drip edge flashing is commonly used at the rakes (gable end edges) and at the eaves (the leading edge of the roof where the gutters are installed). There are two basic types of drip edge. One type is known as “C”, this type of drip edge does not have an overhang. The other type is known as “Extended”. The Extended type has a hemmed overhang at the edge of the roof deck. Both types can be installed on the rakes or the eaves.
To prevent high wind and rain from entering at the rakes, the drip edge is installed on top of the underlayment. On the eaves the drip edge is installed under the underlayment, this allows any water that gets under the shingles to shed safely off the roof. If there are gutters on the eaves, the drip edge should be extended so water will flow directly into the gutters.

Wednesday, November 19, 2008

Childproofing Your Home


As a parent of three and a grandparent of five I realize the challenges, especially when it comes to safety matters. Getting ahead of the game is the answer to avoid harm to your children. Believe it or not, accidental injury is the number one killer of children in American. More children lose their lives to accidents in their homes than to disease or violence. According to the Safe Kids USA organization, 4.5 million children are injured in the home every year.

Every parent knows the danger of sharp corners that can cause head and bodily injuries. Let’s not forget the small objects that any child will put in their mouth and choke on before we know it. Childproofing is a major task and any stone left unturned could result in a potential danger to your child.

We know the dangers of cleaning products and keep them away from our children, but how about the automatic toilet bowl cleaner we use. Dipping their cup in the toilet bowl to get a quick drink is gross, but will not kill them. But a drink out of the toilet with a toxic automatic toilet bowl cleaner in it could be fatal. Toilet lid latches are a great idea, but only if all family members remember to latch them.

A nice warm bath for your baby is a good thing, but water too hot can cause burns and in some cases serious burns. While it is important to adjust bath water to a comfortable temperature for your baby, it is also important to adjust the temperature of your water heater. For safety reasons a water heater should not be set with a temperature higher than 120 degrees Fahrenheit.

All electrical switches and plugs should have cover plates. All plugs should have child proof caps, or Ground Fault Circuit Interrupters (GFCIs) on outlets near sinks and bathtubs.

Beware of furniture that has moving parts, such as recliner chairs and exercise equipment. It is easy for a child to get their fingers or other body parts caught in a moving part.

Installing window stops will prevent a child from getting their head stuck in a window or getting out of a window. This may sound funny, but a window that has stops will only allow the window to open four inches, see how this can help?
Window cords should always be removed or cut from any drapes or blinds to avoid strangulation.

Child latches on washer/dryers, refrigerators, freezers, drawers, and cabinets will also help prevent an accident. Installing door knob sleeves is a simple way to keep a child out of a room that you are not in.

Have your home inspector inspect all decks and balconies for fall protection devices and general safety.

Monday, November 17, 2008

Reversed Polarity?

As a home inspector we find a verity of safety concerns, but one of the most common safety concerns is reversed wiring (reversed polarity) on receptacles. This is a potentially dangerous problem, but one that can be easily corrected. Here is a typical question I received on reversed polarity.

Question:
We are moving to New Castle because of a transfer. We went there and found a house we liked, but we had to leave before the Home Inspector could come. We received his report and everything looks good, but there was a note that some of the receptacles had reversed polarity. The report did not indicate that this is a big problem. Since I do not know what reversed polarity is and I have a fear of electricity, this concerns me.
Can you tell me what is reversed polarity and is it dangerous?
Can this condition be corrected?


Answer:
The wire that supplies the power to the outlets consists of three wires, a black wire a white wire and a non-insulated copper wire. The black wire is the hot wire. The white wire is a neutral, and the non-insulated copper wire is a ground. An outlet is wired with the hot connected to the side of the outlet with the small slot, and the neutral lead is connected to the bigger slot. This is done for safety reasons. Cords have one of the prongs wider so the neutral side and hot side line up correctly to match the wiring of the appliance. Provided the outlet is wired correctly, appliances are wired so the hot wire goes to the on and off switch. When wired this way, when the switch is off, there will be no voltage inside the device. If the outlet is wired in reverse (Reversed Polarity) this means that the hot is wired to the bigger slot and the neutral is wired to the smaller slot. With reversed polarity, now the on/off switch is opening and closing the neutral. This will turn the appliance on and off, but even in the off position the appliance still has electricity running through it. This could be a potential danger, but this is a very easy and inexpensive situation to have corrected.

Thursday, November 13, 2008

Botanical Garden?


From one of our home inspectors in the northeast comes this exciting news of an entirely new botanical technology. While on a routine home inspection our savvy inspector found a startling demonstration of previously unheralded ingenuity, a breakthrough which may nudge Daisy, the replicated sheep, from the headlines, or fulfill the promise of ten-pound tomatoes for every pot.

It was just a routine home inspection, nothing in the outward appearance of the home gave any hint of the startling technological breakthrough sheltered inside. Our intrepid veteran had no fear of dark crawlspaces absent humans for decades, or musty attics where time stands still. He had seen Moloch in coal-dust scented fireplaces, braved diabolical electrical service patterned after Dr. Frankenstein's laboratory. But nothing in his experience had prepared him for the amazing display of spontaneous ingenuity he was to encounter one bright New England morning.

The owner had vacated, there was standing room only throughout. Left behind, for posterity, perhaps, or as a gift to mankind, or maybe as a riddle for the University thinkers sure to swarm when the discovery sizzled on the evening news like a Star Wars death ray vaporizing one of Saddam's wobbly SCUDs, was the Mutha of All Inventions. It was awesome. Our man stood agape.

To be sure, a home inspector has to know a lot about a lot. Like a many-headed Hydra, one head must be a carpenter, another an electrician, still another a roofer, yet another an HVAC technician, another a mason, another a plumber. But our expert was humbled by the remarkable synthesis of technology left behind in that living room. He was as in a Holy place, made small by soaring arches reaching heavenward, sensing the presence of the infinite. He took off his hat and scratched his head.

What in tarnation was it?

When we are befuddled by the complex, we do well to fall back on the folk wisdom "one thing at a time." So did our man. It began where a drop of water was about to fall from a blister on the ceiling. For a moment, the drop quivered, then fell. Well, a leaky ceiling is a leaky ceiling.

As it tumbled through space, the drop was intercepted by a funnel fixed to the end of a hollow pipe and suspended from the ceiling. Through this pipe passed a patient multitude of drops, one by one, across the vast empty space below the ceiling to a destination twenty feet away, above a big picture window.

After their long journey the trickle once again separated into drops, again falling one by one, this time into a two-pound coffee can suspended on a string. The coffee can is tapped all the way around with 1/4" plastic tubes, hanging like arms of an octopus. Each of the plastic tubes leads to a potted plant.

One more genius!

Tuesday, November 11, 2008

Fired Up


Nothing draws people to a convivial gathering like a crackling fire on a blustery Winter day. Friends and family love the warmth of a fire-and each other. Like a magnet, the dancing flames draw us close. Let's look at the way fireplaces are built and the way they should be maintained to assure our safe enjoyment of them.

Fireplaces are inspected as part of a Home Inspector’s standard service. The firebox is examined for cracks and creosote buildup.

Creosote is a gummy or sometimes-hardened residue left by incomplete combustion. The burning of green or resinous wood will deposit elevated levels of creosote in the vapors of these woods as they condense on the inner walls of a cool chimney. Creosote is not easy to remove, so it is best to burn seasoned hardwood to avoid, as much as possible, the creation of creosote. Creosote build-ups can be very dangerous when they catch fire. The heat of flaming creosote is intense and may crack the chimney liner and make your chimney look like a blowtorch from the outside.

The lining of a firebox is usually brick. Firebrick is different from ordinary brick and made to withstand the heat of your fireplace. The rear of the firebox is called the fireback and the sides are called covings. On the floor of the firebox you will probably see a small metal access cover to an ash dump. This makes it easy to get rid of ashes by raking them into the ash pit underneath. Home Inspectors always look for cracks in the firebox which might allow sparks to pass or poisonous carbon monoxide, a normal byproduct of combustion, to find its way out to living areas of the home.

Your Home Inspector will also check for the presence and operation of the fireplace flue damper. The damper should be kept closed when the fireplace is not in use. The typical forced air furnace will drive your home's heat out the chimney if the damper is left open.

The safe, proper fireplace will also have a hearth at least 16" deep in front of the firebox, or 20" if the firebox opening is greater than 6 square feet. A mesh firescreen or tempered glass viewing doors will protect the area in front of the hearth from possible sparks or shooting embers.

Your fireplace flue should not be shared with any other appliance, such as your furnace, or venting source. Build your fire with kindling rather than lacing the logs with flammable liquids.

Your home should be built so that none of its weight rests on your fireplace and its chimney. This is so that, if the house should settle, the fireplace and chimney will not be subjected to stresses which might cause cracking or misalignment of the masonry.

Now don't get all fired up, be safe and enjoy that cozy fireplace.

Wednesday, November 5, 2008

Preventing Mildew

If you are a Realtor, Home Inspector, Handyman, or in any other business that involves you being in many different homes for a living, you know that distinct smell of mold/mildew. Most of us at some time or another, have opened a closet or walked into a basement or a crawl space and have been greeted with that distinct musty odor. If you live in an area that is known for high humidity, you know all too well the problems with mold/mildew. The fact of the mater is that no mater where you live, certain conditions in areas of your home can produce mold/mildew.
Here is a sample of a common mold/mildew question.

Question:
We live in an older two-story home with a full basement. Although the house is full of old-world charm’ it also is filled with a musty mildew odor, which is not so charming. I know with older homes there is going to be some mildew-related problems. The basement is the worst, followed by the bathrooms and closets. Are there things we can do to keep it under control? We would appreciate any tips.


Answer:
There are several steps you can take to combat mildew, starting with cleaning closets, dresser drawers, basements, and any place where mildew is likely to grow. Using a 60-watt light bulb continuously can dry air in closets and other small areas. The heat will prevent mildew. Do not let the bulb touch anything! In addition, hang the clothes loosely so that air can circulate around them.

Controlling dampness in the basement is an important step. Good working gutters and downspouts, and positive sight drainage will help control the dampness that results from ground water. Dampness also can come from condensation, which can be controlled by good ventilation.

Cooking, laundering, and bathing may add 2 or more gallons of water a day to a house. It may be necessary to use a mechanical dehumidifier to control dampness. They always help.

Get rid of musty odors as soon as possible to prevent further mold growth.

It may be necessary to scrub cement or tiled walls and floors in basements, baths, and kitchens with chlorine bleach solution. Use one cup of liquid household bleach to a gallon of water. Rinse with clear water and wipe as dry as possible. Keep windows open until walls and floors and floors are thoroughly dry.

If you can limit dirt and moisture, you have a good chance in eliminating mildew.

Tuesday, November 4, 2008

Shower Flush Syndrome

As a home inspector we are asked a wide verity of questions by homeowners dealing with all aspects of their homes. The "shower flush syndrome" question is one I am asked offten.

Question:
We have lived in our four-bedroom three-bath house for three years. I love the house, but I am tired of the “shower flush syndrome”, you know when you are taking a shower and some one flushes the toilet, and the temperature changes to HOT.
Is this something that is just normal, that I have to live with?
My friend said that it could be corrected by redoing the whole plumbing system.
If there is anything that I can do please let me know.


Answer:
At the time the house is built if it is plumbed with larger pipes with enough volume and pressure many fixtures can be used at the same time without noticeable changes in water temperature, and pressure. For example only two fixtures in a bath are run on a ½ inch pipe (the smaller pipe); usually the line to the toilet, and the line for the sink. The hot and the cold for the tub and shower would be run with ¾ inch pipes (the larger pipe). With the increase in pipe size, this will help prevent drastic changes of temperature in the shower when the toilet or sink are being used.
In your case I think that the cure for the problem would be replacing your old tub and shower valve with a pressure balanced tub and shower valve. The pressure balanced tub and shower valves are single handle valve that balances the hot and cold water to try to maintain a temperature range plus or minus 2 degrees.
Call some of your local plumbing companies and compare prices.

Monday, November 3, 2008

Common Mold Questions

As a home inspector I receive my share of mold questions. Having a mold/air quality test is a good start, but controlling moisture in your home is the key to mold prevention. Here is a sample of the mold questions I receive:

Question:
I saw your article on crawlspaces and found my vents closed and about a quarter of an inch of black mold completely covering the wooden beams and insulation. I had a couple of questions. When I turn on the heat I smell a rich sweet smell; is this mold? I had the entire heating system cleaned and sealed but the smell is still there, though lessened. Is this the mold problem? What can be done to take care of this problem?
Also, do you know if they make white vapor barrier? I found a copperhead in the crawlspace and thought that if the vapor barrier were white, I would avoid nearly picking them up in the future.

Thanks for any help!!!


Answer:
I am glad you opened your vents, but that may not take care of your mold problem. If you have a quarter inch of mold on the wood beams, you have two concerns. The first is that mold will try to digest your wood. Not only is mold eating away at your house, it could be eating away at your health. Mold and mildew need only a damp moist environment and organic material to thrive. They can breed and thrive in drywall backing, carpet backing, in the moist dust particles in your heating system, wood beams, bottom of sheathing, baseboards, and wallpaper to mention the most common.


With exposure to mold and mildew it is common to experience headaches coughs, skin rashes, nausea, runny noses and other sinus problems, and in some cases memory loss. The sweet smell could be mold or mildew; the duct cleaner also has a sweet smell. The duct cleaning surely will help, but it may not completely cure your problem. Here are some things you may consider doing;

Ø Open all the crawl space vents
Ø Make sure your vapor barrier is covering the entire earth portion under the house
Ø Make sure all gutters and downspouts are working properly
Ø Make sure that the earth around the foundation slopes away from the house
Ø Change the furnace filter often

To conquer mold and mildew, you must first conquer moisture. The best defense is good ventilation and water management. Also checking the trouble spots such as the furnace and the bathrooms.
Check your bathroom for plumbing leaks and make sure the exhaust fan works properly and is vented to the outside.
When you have your furnace serviced, have your service tech check the condensate tube; to make sure it is draining properly.

If you or your family are still experiencing any of the aforementioned health symptoms, you may consider having a professional home inspector perform a mold test. You can find some excellent sites on the web, just type “mold” in your search engine, and you will find a lot of good information.
About your snake troubles, you have two choices; You can get a king snake under there and you will not have any poisonous snakes including copperheads. Or perhaps you may prefer to purchase some six-mill white poly sheeting. You can find this at your local building supply. This material comes in different widths; find the size that works best for your size of house. It is fine to install the new poly over the existing, just make sure that the old poly is laying flat.

Wednesday, October 29, 2008

NATIONAL FIRE PREVENTION MONTH

According to the National Fire Protection Association, each year, there are total of half a million residential fires reported and more than 4,000 Americans die in fires in their home. Property losses for residential fires total more than four billion dollars a year. As October is Fire Prevention Month, The HomeTeam Inspection Service INC offers tips to ensure your family’s safety:

Children
· Keep lighters, matches or other flammable materials out of the reach of children.
· Babysitters should be aware of escape routes in the house as well as fire department telephone numbers.
· Do not keep items such as cookies or candy near the range or stove.
· Include small children in fire escape route planning and rehearsal. They must understand that they can't hide from fire under a bed or in a closet.

Escape Routes
· You should have a family escape plan and an alternate route. Conduct home “fire drills.”
· Your plan should include an outside meeting place to count every family member.
· You should have at least two exits from the house.
· Fire department numbers should be posted on every telephone.

Kitchen Safety
· Flammable or combustible items should not be stored above the stove.
· The stove should not be left unattended while cooking.
· Wear short or tight-fitting garments that won’t droop while cooking.
· Don’t rest or keep pot-holders, plastic utensils, towels or other non-cooking equipment on or near the range.
· A fire in a pan should be smothered with a lid—never try to put it out by throwing water on it. If cooking oil starts to smoke, turn down the heat.
· Keep a fire extinguisher handy.

Electricity
· Avoid using extension cords wherever possible. Extension cords should never be run under rugs or hooked over nails, or cross over doorways.
· Check electrical cords for loose, worn or frayed cords. Unplug before inspection.
· If a fuse blows (or a breaker "trips"), find the cause. Remove excess appliances from a breaker circuit that "trips" often.
· The correct fuse size for each socket in the fuse box is 20 amps for lighting circuits.
· Kitchen appliances, such as a toaster or coffeemaker should be unplugged when not in use.


Smoke Detectors
· You should have at least one smoke detector per floor in your home, with a distinct warning signal loud enough for you to hear in your sleep. Test once per month.
· Smoke detectors should be placed near bedrooms, either on the ceiling or not more than a foot below it on the wall.
· Replace batteries according to manufacturer’s recommendations and never disconnect them.


Heaters and Heating Systems
· Operate portable electric heaters on the floor, at least three feet away from upholstered furniture, drapes, bedding and other materials, and never use them to dry anything.
· Turn heaters off when family members leave the house or are asleep.
· Do not use wood burning stoves and fireplaces unless they are properly installed and meet building codes. Use a fireplace screen to contain sparks.
· Have the chimney and the heating system checked at lease once per year by a trained professional.
· Propane tanks and other fuels, such as gasoline should be stored outside the home in an approved safety container.

Following these few safety tips will help insure your family’s safety for years to come.

Friday, October 24, 2008

Cracked Up


Is your foundation all it’s cracked up to be?

If you have lived in your home for a while, you have probably seen your share of cracks in the foundation. But are these unsightly marks really anything to be concerned about? Well, it all depends. Cracks in your foundation can be a result of natural expansion and contraction or a sign of a more serious problem, like poor grading. However, it all depends on the type and the size of the crack to determine if it’s a problem or not.

Types of cracks:
There are three types of foundation cracks: horizontal cracks, vertical cracks and step cracks.


Horizontal cracks are usually found in, brick and concrete-block foundations. These cracks are often formed from excessive pressure on the foundation from extremely wet soil around the house. The severity of the crack depends on the width of the opening. For instance, if the horizontal crack is ¼ of an inch wide or wider, you will want to contact a licensed structural engineer for further evaluation. Other indications that a horizontal crack is severe, is if the crack causes the wall to bulge a ½ inch or if the crack has differential displacement, which is when one side of the crack has been pushed in or out more than the other side.

Vertical cracks or hairline cracks are found in all types of foundations and are typically very small and the same size throughout their length. A vertical crack becomes worrisome when the crack starts to grow bigger at the top than at the bottom, or when it goes all the way down to the bottom of the wall and into the footing of the foundation.

Step cracks on the other hand are characteristically found in brick, stone and concrete-block foundations. And just like their name indicates, these cracks usually run up along the mortar joints of the foundation like steps. These cracks are viewed severe if they measure ¼ of an inch or wider, are wider at the top than at the bottom or show signs of differential displacement. In any event, it is always best to consult a licensed structural engineer to evaluate and diagnose the problem.

New home buyers
If you are looking to purchase, or are in the process of purchasing a new home, your home inspector will check for visible cracks in the foundation during your inspection.

What to expect during your inspection
During your home inspection, your inspector will check all the visible structural components of your home, by probing the structural components where deterioration is suspected. However, your inspector will not probe an area that could potentially damage a finished surface or where deterioration is visible.

In addition to checking the stability of the foundation, your inspector will also check for any visible cracks and to see if the grading around the foundation is adequate. Because flooding can be a problem no matter where you live in the United States, your inspector will make sure to check for visible water stains around the foundation and baseboards.

One way home inspectors can detect if there has been water damage to a home is by seeing if there is a white, crusty build-up called efflorescence on the foundation. Efflorescence is often caused by water seeping through a foundation’s walls and floor. Other indicators that there has been water damage to the home is if there are traces of mold and mildew, or if there are signs of rust or decay around the basement’s or crawl spaces’ window framing.

After your inspection is complete, your home inspector will note his/her findings in your home inspection report. These details will likely include a description of the foundation, the floor structure, the wall structure and the ceiling structure. If any of these areas are of concern your home inspector will note that these areas may need further evaluation by a licensed structural engineer.

Thursday, October 23, 2008

Stained and Discolored

As a home inspector I receive a lot of questions about repairs and renovation, especially about the two most important rooms in the house. Yes you guessed it, the bathroom and the kitchen. The condition of these two rooms is important to the resale value of your home.
Here is a good example of a bathroom renovation question:

Question:
I recently bought a colonial home. Everything was perfect, except the bathroom – it was old and dingy. I thought that I could spruce it up with a fresh coat of paint and a good cleaning, but that was not the case. The bathtub is nice on the outside, but badly stained and discolored on the inside. I’ve tried everything under-the-sun to try and restore it back to its original luster, but so far nothing has worked. I’m starting to consider either painting the tub or installing an acrylic bathtub liner over the old tub. Is there a downside to doing either one of these?

Answer:
I understand your frustration. Over time bathtubs can get old and dingy, making it more of a battle to clean then it is worth. And if you’re frustrated now with the look of your bathtub, then I do not recommend painting over it. Paint will cover up the stains temporarily, but over time it will begin to chip, peel and fade – potentially making your tub look even worse than it already does.

I think installing an acrylic bathtub liner is a good way to go. Acrylic bathtub liners come in a variety of sizes and colors, so you can easily find the right fit for your tub size and bathroom décor. Plus, acrylic liners resist mold and mildew, which is a nice bonus if you are constantly battling this problem in your bathroom.

Acrylic bathtub liners are available at most hardware stores and through professional bathtub liner carriers. Honestly, the only difference between the two is if you decide to purchase the liner at a hardware store, then you will more than likely have to install it yourself; where as a professional carrier will install it for you – usually within a day!

Monday, October 20, 2008

Audits are Good for Us

Let's face it, our homes are one of our biggest investments. There are many things a home inspector can do to help protect your investment, and even help you increase the value of your home, including an Energy Audit. Increased energy efficiency and resource conservation are good for the environment and good for the economy. Indeed, they are good for all of us. A home energy audit will show you how to save money on utility bills, increase the comfort of a home, increase the value of a home, and help improve the environment. An energy audit will examine, measure, and evaluate the factors that affect energy use in a home, finding all energy saving opportunities. The information gathered during the energy audit is analyzed using specialized software to produce a comprehensive Home Energy Tune-uP® Report.
The Report shows which energy-efficiency improvements would reduce energy costs and make the home more comfortable.
The analysis takes into account regional variables such as local weather, implementation costs, and fuel prices.
The Report contains estimates of the savings, costs and payback for each energy-efficiency recommendation.
The Report identifies the group of improvements that, if financed, will save more on energy bills than it costs. These are the improvements that everyone can make since they require no out-of-pocket cost when financed.
The detailed recommendations section enables contractors to provide preliminary cost estimates without a visit to the home.
It also explains how to get the best energy savings from these improvements by listing related no-cost low-cost measures that can be taken.

You can reduce your energy expenditures by developing energy saving habits:
· Showers usually require less hot water than baths. Additional savings can be realized by installing simple water-saving shower heads. This will reduce water consumption, which is good for everyone. The primary benefit is lower heating bills brought about by using less energy to heat less water.
· Use heat-generating appliances such as washers, dryers or ovens during the cooler hours of the morning or evening. This reduces the load on your air conditioner in the summer, and actually helps heat the house in the winter.
· Electric cook tops are energy drains. Use the appropriate burner for your pan size. Also, flat bottom pots make better contact and conduct heat from the elements more efficiently than pots with warped or rounded bottoms.
· Wash only full loads of clothes when possible and clean your dryer's lint filter after every load.
· Consider replacing incandescent bulbs with compact fluorescent bulbs. Fluorescent bulbs put out approximately four times as many lumens per watt. For example, a 25 watt fluorescent bulb provides as much light as a 100 watt incandescent bulb. Fluorescent bulbs also last about ten times as long!
· In the summer, keep drapes and curtains closed on the sunny side of the house. In the winter, open those drapes and curtains on sunny days to take advantage of the sun's heating power. Close all drapes, blinds or shades at night in winter to make use of their insulating properties.
· Use an exhaust fan to pull excess heat and humidity out of the kitchen and bathroom in the summer. Be aware, however, that exhaust fans can rapidly pull the heat from your house in the winter.
· Perhaps the most often quoted hint for saving energy in the home is to set thermostats at 68° F in the winter and 78° F in the summer.

These How-To's are provided as a service from Lowe's, the Original Home Improvement Warehouse of How-To information for the World Wide Web.

Thursday, October 16, 2008

Pipe Dreams

A home inspector is not a code inspector, and the main reason is that a house that was built to code a few years ago my not meet the code standards of today. A home inspector reports major defects, safety concerns and maintenance issues, this supersedes codes. In many cases the safety issues we report are in violation of a code anyway.
Here is an example of a related question I received:

Question:
I live in an older home that thought out the years has had many repairs and updates, not to mention many different people working on it. Recently we had our water heater go out and I think I hired the wrong person to replace it. We have a gas water heater with a metal flue pipe coming out of the top of the water heater then turning and going to the chimney. My concern is when the water heater was replaced, the installer used a plastic pipe called CPVC. This plastic pipe runs with in an inch of the flue pipe, and the flue pipe gets hot. We had a home inspector do a pre-listing inspection and he wrote this up as a defect. I tried to call the installer to find out if this work was up to code, but his phone is disconnected and it appears he has vanished.
Do I need to call some one else, or is this not a problem?

Answer:
In this case you are going to need to have a professional plumber correct this installation. Gas water heaters are require to have a short piece of metallic pipe or appliance connector at least six inches long, above the flue piping. This transition piece is required to prevent damage to the CPVC from excessive heat build-up in the flue. In some areas CPVC can be installed directly onto electric water heaters with special transition fittings, but gas water heaters always required the metallic connectors. A licensed plumber will consult local code requirements prior to installation, and in most cases a local permit is required. The home inspector reported this because it will turn into a maintenance issue and maybe a safety concern.

Tuesday, October 14, 2008

First Impressions


No matter in which price range your house falls, the buyer’s first impression is one that sets the mode for the transaction. The phrase “curb appeal” is not just another cute phrase, it plays a large role in getting high market value for your house. The first impression certainly starts with the exterior. There are inexpensive things you can do to achieve good “curb appeal”, such as:


Keep the grass freshly cut
Avoid clutter in the yard
Fresh paint on wooden fences
The front door needs to look good (fresh paint) if needed
Make sure that all door handles are tight and clean
Wash or paint the exterior of the house
Make sure the windows are cleaned inside and out
Make sure that gutters and downspouts are firmly attached, and in good working order
Fresh mulch in flower borders

Tips for the interior include:


Avoid excessive things hanging on the wall
Avoid excessive knick-knacks sitting around
Keep rooms as open as possible (you may consider a temporary self-storage unit)
Clean or paint walls and ceilings
Carpets should be clean and smell good
Remove things from under the sink cabinets


Repair all plumbing leaks, this includes leaking faucets, and duct-taped drain traps


Make sure all light fixtures are clean and free of dust

Sight is not the only thing that makes a good first impression, the nose plays its part as well. These things will help in that department:
Keep the central air filter changed (it makes no difference if it is the heating or cooling season) Pour water in basement floor drains (this keeps the drain traps from becoming dry, and letting in sewer odor)
Control cigarette and pet odor


When making a real estate transaction, hiring professionals will help you get the most value for you transaction. Real Estate Professionals and Professional Home Inspectors are key players to have on your team to protect this important investment.

Wednesday, October 8, 2008

Dead Man Does Repair

Imploding Basement Foundations are generally but not limited poor water control. The foundations that are most vulnerable are the ones that are built with CMUs (cinder block). Consequently these foundations require good water control to maintain their structural integrity.

Here is an example of foundation questions I receive:

Question:
Recently we inherited an early 1900’s house when my Grandmother passed away. We were looking for a house, so we decided to not sell my Grandmothers house, but keep it and live there.
The work that the house needs is mostly things that we can do ourselves, except for one thing. The basement wall on the up hill side is caving in. We know that this is a big job, and probably costly.
Can you give us some idea of who to call and what kind of work is involved?
Can you tell us how much of the house they will have to tear down to fix this problem?


Answer:
The first thing to do is call some foundation/basement repair companies, to get estimates. The cost is based on the method that has to be used. If the wall is bowed in only a couple of inches then, it can be repaired with soil anchors (Dead Man).
The soil anchor method is done with minimum disturbance to the house and the landscaping.
Here is the procedure for the soil anchor method:
* The installers will find good hard ground, around ten feet or so from the out side of the wall.
* Then they will dig a hole about two feet square, every six or eight feet.
* Then an earth anchor is placed in the holes; these anchors are a steel plate about two-foot square.
* From theses holes they dig a narrow trench to the house for a steel anchor rod to go in.
* Where the trenches meet the house, a hole is drilled through the basement wall
* The steel rod is attached to the earth anchor.
* Then the steel anchor is placed in the trench and through the anchor holes in the basement wall.
* Where the rod comes through the basement wall, a metal plate is attached to the end of the rod, (these plates are about 16 inches square).
* The steel wall plates are tightened until the wall is back to its original position.
When the walls are extremely bowed, they use a dig-out method. With a small backhoe the dirt is removed from the outside walls, this removes the soil pressure. Then the soil anchor method is used to pull the walls back in place. This method is more expensive and makes a little more mess, but works very good.

It is very important to keep gutters and downspouts in good working order, and maintain the soil level around house so water will run away from the foundation. Water around foundation will cause the hydrostatic pressure that implodes foundations.

A professional home inspector will recognize and explain poor water control issues your home may have.

Tuesday, October 7, 2008

MORE THAN MEETS THE EYE

Buying a house requires a lot of different steps to complete the process. More and more questions get asked about what information the consumer needs to assist them in making decisions to protect their family’s health as well as their investments. Having a home inspection definitely plays an important role in achieving this. There is a trend to take additional steps to protect health and investment issues, by having additional inspections performed. Some of the most common health questions include questions about mold, radon, lead, and water testing. The following are some of the most commonly asked questions:

Why should I have the water tested if the house I am buying has a private well?

To prevent the health risk of you and your family drinking or bathing in contaminated water. Sometimes a well becomes contaminated because it is defective. This can be very expensive to repair or replace. Your lender may require water testing. The EPA and The American Groundwater Trust recommend annual testing of a private well.

Is lead-based paint in my home a problem?

Not unless it is disturbed during remodeling or maintenance. lead base paint should be properly cared for and not allowed to deteriorate. Exposure to lead dust can cause permanent damage to the nervous system, especially in children and pets.
A trained professional can perform lead-dust testing to determine the lead levels.

Why should I ask for a radon test?

There is scientific proof that Radon gas is a known human lung carcinogen. Prolonged exposure to high levels of radon gas can cause lung cancer. If you do not have a test, it could cost you up to two thousand dollars to have a radon mitigation system installed after closing.

Why is mold a problem?

Mold can cause health problems and not be visible. If left untreated it can continue to grow and spread, eating building materials like wood and dry wall. Mold spores can cause many health problems including:
Ø Asthma and allergic reactions
Ø Respirator problems
Ø Nasal and sinus congestion
Ø Burning, watery, red eyes or blurry vision
Ø Sore throat and dry cough
Ø Skin irritation
Ø Sometimes nervous system problems

Finding out what additional testing you should have done on your home is very important to you and your family’s health. You will find that most testing is not expensive, but can sure save you money in the future.

Wednesday, October 1, 2008

Don't Let Your Dreams Turn Into Nightmares


Let's face it everybody dreams of their perfect home, some dream of a classic older home, some a home with a view, some a starter home with investment potential, or a home near the beach. No matter what your dream home is it will take months to find it, years to save up for it, and it's going to take decades to pay for it. Yes, your dream home certainly represents one of the biggest investments, both financially and emotionally, that you'll ever make.

And that's exactly why it's so important to have your prospective new home inspected by a reputable home inspection company prior to closing. Otherwise, that dream home could turn into a nightmare of unexpected repair bills.


"Now wait," you may be thinking. "Looming ahead of me is a monster of a down payment, closing costs, points, and on and on. And now you're suggesting that I sink another $200- $400 into a home inspection."


"Why bother? After all, the sellers are required by law in most states to disclose any defects in the home before we close. And if they don't they have to pay for any repairs. So I'm safe, right?"

Wrong.
Think about it. How can the seller know, for example, that the first time your two teenage daughters jump into their showers at the same time, the water pressure isn't going to slow to a trickle? And what happens if you do decide to have someone, say Uncle Joe or Grandpa John, who's been in the construction business for centuries, give your prospective new dream house the once over, but no one picks up on the fact that the dishwasher is malfunctioning? You definitely don't want to discover firsthand that this vital piece of kitchen equipment leaks all over the floor each time it hits the rinse cycle.

When you're investing virtually your last dime in a new home, the last thing your already stretched-to-the-point-of-breaking budget can withstand is an unexpected repair bill. So, rather than representing yet on more cost, a through pre-purchase whole-house inspection may actually save you thousands of dollars.

In many parts of the country, buying a home without the benefit if a pre-purchase inspection is unthinkable. And in many cases, the sellers - rather than the buyers - are requesting the inspections for their own protection, as well as to minimize haggling over the selling price. The National Board of Realtors reports that 4.9 million homes were sold in 1997. Sources estimate that about 65% of the homes sold were inspected prior to closing.

A basic home inspection includes a comprehensive visual evaluation of literally hundreds of items throughout a structure including the roof, mechanical and electrical systems, exterior siding, windows, decks and garages. Also inspected are interior walls, ceilings, steps and floors, heating and cooling systems, plumbing and all built-in appliances, including refrigerators, stoves and dishwashers.

Many inspection companies can also provide additional services such as termite and other pest inspections, radon testing, asbestos testing, and testing for the presence of other environmental hazards. One phone call can place at your disposal dozens of professionals dedicated to helping you buy with confidence. Home inspections are conducted by professional inspectors who are experienced in many areas. Inspections generally require several hours to complete; however, some companies are able to greatly reduce the turnaround time by using a team approach. A team of inspectors, each with a different area of expertise, conducts the evaluation and prepares the inspection report.

This detailed written report will include a summary of the general condition of your prospective new home and will disclose any major defects. Buyers should be aware that even new homes have defects.


Ideally, buyers should make the purchase offer contingent upon the satisfactory completion of a whole house inspection. If this is not possible, it's important to schedule the inspection as soon as possible after the offer has been accepted so any major defects can be corrected before closing.

As with any service, your home inspection is only as good as the professionals who conduct the evaluation. So, when choosing a home inspection team, be sure to ask these important questions:

1. Does the inspection company have an interest in or a
connection to a repair or remodeling company?
Such an affiliation might cause a conflict of interest.
2. How long will the inspection take and how soon will
you receive the written report? Is it detailed and
easy to read? Ask to see a copy of an actual
report.
3. Exactly what will the inspection include? How much
will the inspection cost?
4. Does the company encourage the home buyer to attend
the inspection and ask questions? Being present
during the inspection allows you to see the home
from a different perspective and provides valuable
information on the care and maintenance your home
will require in the years to come.
5. Can the inspection company offer specialized
inspections performed by a qualified professional?
6. What sort of insurance does the company carry? A
reputable firm will carry professional errors and
omissions insurance, general business liability, and
worker's compensation.
7. Does the company follow the guidelines of any
professional organizations such as the American
Inspectors Association or the American Society of
Home Inspectors (ASHI)? Does the company provide
additional service such as termite and other pest
inspections, radon testing, asbestos testing, and
other environmental testing? Dealing with one
company for this full range of services saves you
both time and money.


The bottom line is; "You can not afford not to have a home inspection".

Thursday, September 25, 2008

More on Radon

What’s involved in testing for a Real Estate transaction?

During most real estate transactions, time is an important factor. Most decisions are made during the time restrictions of the parties involved. It is important, due to these constraints, that parties have the best data available when making decisions.

Radon tests done by a qualified tester, using a Femto-TECH CRM-510 Continuous Radon Monitor with high sensitivity provides the greatest amount of information and data for decision making. The EPA recommends when doing a Radon test involving a real estate transaction, that not only the Radon be measured, but also that humidity, temperature, barometric pressure and tamper resistance be logged. This helps in assuring proper testing conditions are met. The femto-TECH, CRM-510 meets or exceeds these guide-lines and is an EPA listed and approved instrument of the highest quality. Best of all, the results of the test can be printed directly after the conclusion of the test. There is no waiting for samples to be sent off to a lab for analysis.

When having a radon test done that involves a real estate transaction, it is essential that all EPA guidelines and standard protocols are followed.

• Closed house conditions must be maintained for 12 hours before the start of the test and for the test duration. Close all windows and doors and keep them closed during the test period. Doors can only be opened and closed to enter and leave the premises, but windows will need to be kept closed. Overhead garage doors need to be closed except for entry and exit of a vehicle.
• Minimize operation of bathroom or kitchen exhaust fans or non-essential exhaust appliances.
• Do not operate fireplaces, ceiling fans, whole house attic fans, electrostatic precipitators, window air conditioners, or any other external-Central heating and cooling systems can be operated as normal.
• The radon testing device cannot be tampered with or moved during the test.
• The testing device placement shall be in the lowest area deemed livable in the structure. Device placement shall be a minimum of 20 inches above the floor and no higher that 8 feet, and away from outside door and window openings.
• Tests should not be conducted during extreme weather conditions.

The above steps are designed to give uniformity to the test data when making decisions with reference to the EPA radon action level of 4.0 pCi/l.


What Can Be Done About The Radon?

As stated earlier, Radon is everywhere including your home; you cannot get rid of it completely. But through Radon Mediation you can bring the level of Radon down below a level that would be a health risk. The first step is to have the home tested for Radon by calling your local Home Inspector to schedule a test at the same time you are scheduling a home inspection.

Wednesday, September 24, 2008

Radon?

As a home inspector I always receive questions about Radon. The big question is "Why Should My Home Be Tested for Radon?"

As the public becomes more aware of Radon, there has become an increased demand for testing of homes before a purchase. Most relocation companies now require Radon testing as part of the transaction. The EPA and a number of states have incresed their awareness programs. The national average indoor radon level is about 1.3 pCi/L while outdoor radon levels average 0.4 pCi/L. The higher a home’s radon level, the greater the health risks. The EPA has a Radon Zone map that rates the concentration of radon into 3 zones. Zone 1 of the EPA’s radon potential map (highest level)? Zone 1 is described as an area that has a predicted average indoor radon level of greater than 4 pCi/L. The level of 4 pCi/L is called the action level, where the EPA recommends that action be taken to reduce the indoor concentration of Radon. Zone 2 is counties have a predicted average indoor radon screening level between 2 and 4 pCi/L. Zone 3 is counties have a predicted average indoor radon screening level less than 2 pCi/L.

What is Radon?

Radon is a radioactive gas that is colorless, odorless and tasteless. It is formed by the natural breakdown of uranium in soil, rock and water. Radon also breaks down to form additional radioactive particles called “progeny”.

When Radon escapes from the ground into the outdoor air it is diluted to low concentrations and is not a concern. However, radon that enters an enclosed space, such as a home, can accumulate to high levels. The only way to determine the concentration of Radon in a home is testing by a professional, like The HomeTeam Inspection Service.

What is the Risk?

The Surgeon General warns that radon is the second leading cause of lung cancer in the United States. Radon gas and radon progeny in the air can be breathed into the lungs where they breakdown further and emit “alpha particles”. Alpha particles release small bursts of energy, which are absorbed by nearby lung tissue. This results in lung cell death or damage.

When lung cells are damaged, they have the potential to result in cancer when they reproduce. Cancers caused by radioactivity are started by chance and not everyone exposed to Radon will develop lung cancer. The time between exposure and the onset of the disease is usually many years.

The risk of developing lung cancer from Radon depends on the concentration of radon in the air you breathe and the length of time you are exposed.
Taking the necessary actions against the radioactive gas that cannot be seen, smelled, or tasted requires getting homes tested for elevated levels. Radon could not only be harbored in the home, but exposure can be a potentially dangerous health hazard. As Realtors, you can also direct your clients to the EPA’s “Home Buyers and Sellers Guide to Radon” www.epa.gov/iaq/radon/pubs/hybyguid.html and “A Citizens Guide to Radon” www.epa.gov/iaq/radon/pubs/citguide.html

Stay tuned for more on radon tomorrow.

Monday, September 22, 2008

The Top Ten

As a home inspector I am often asked what are the Most Common Home Defects that I find when inspecting a home. The list may vary, but this list created by The HomeTeam Inspection Service is very accurate:

Poor Drainage- Improper drainage can lead to water intrusion in the basement homes and even severely compromised foundations.

Failing or Aging Heating and Cooling Systems- Older heating and cooling systems require maintenance and may be energy inefficient. There is also the risk that they can emit dangerous carbon monoxide fumes that are harmful to the family.

Environmental Hazards- Older homes may contain lead-based paint, high levels of carbon monoxide, radon, toxic molds, and even asbestos.

Inadequate Ventilation- This occurs when moisture accumulates in homes which damages interior walls and structural elements.

Improper Maintenance- Taking poor care of your household appliances can create consequences. Simple actions like cleaning out the lint trap in the clothes dryer can help prevent a fire.

Plumbing Problems- The pipes under your sink can be made of incompatible materials that lead to dripping faucets, leaking fixtures, and slow drains.

Roof Problems- The roof of your home may contain old or damaged shingles and improper flashing due to rain. The overall structure of the roof may be affected because of improperly installed collar ties and ridge beam supports.

No Permit- Many homes do not have permits for finished basements, deck additions, and hot tub and pool additions. This can lead to unnecessary fines when putting the house up for sale.

Electrical Safety Issues- A home with an out-of-date or insufficient electrical system can lead to fires and electric shock. Examples of other electrical safety hazards are ungrounded outlets, lack of Ground Fault Circuit Interrupters (GFCI), aluminum wiring, and faulty wiring conditions in electrical panels or elsewhere in a building. These are potentially hazardous defects and not to be taken lightly.

Rotted Wood- Wood placed around areas that are frequently wet can begin to rot. Wood around bathtubs, showers, and toilets are especially defective. The exterior of the home, including the outside trim of the house, decks, and roof eaves, should also be checked regularly for signs of rotting.

Knowing the top 10 most common house defects can help you prepare to put your home on the market. Check these areas of the home often to prevent damage and provide repairs when needed. Your local home inspector can perform a pre- listing inspection to provide you with a detailed list of any deficiencies that require attention.

Thursday, September 18, 2008

Stained for Life

As a home inspector when we see stains on a ceiling it usually is a sign of past or present moisture intrusion, and in most cases it is hard for a home inspector to know if the stain existed before repairs. When a home inspectors sees a stain on the ceiling he will have to report it, and this can possibly delay closing until the problem is worked out. The problem with moisture stains is even after you re-paint they will bleed trough, unless you seal the area before you paint. When a client is selling their house, they should have a pre-listing inspection, so they will know what issues to address that could possibly be a red flag for the buyer’s inspector. The cost for the pre-listing inspection is well worth it because of all the problems it can eliminate.
Here is a good example of water stain problems:

The Client Wrote:

We have lived in our present house since it was built and have always taken good care of it. If there was ever a problem, we took care of it right away. We wanted to keep up the regular maintenance, so we can keep the value of our house up as high as possible.

About three years ago during the rainy season, we noticed water beading up on the ceiling in our dining room. We called some roofers the next day. After three estimates and lots of advice, we decided to replace the failed flashing that caused the leak, and to completely replace the now 20-year-old roof. We hoped the leak problem was solved for good. After three years and numerous spells of rain, we never noticed another leak.

Now we have our house up for sale. The stain on the ceiling from the leak long ago still shines through the mutable coats of paint we used to try to cover it up.


My Reply:

As I always say, if you have major work done that comes with a warranty, make sure that you can transfer it to another owner. A three-year-old roof is a good selling point, especially in your part of the country.

As for your stain, this is a commonly asked question. Your local paint store can help you with the products just for this problem. These products paint on like a primer, but unlike an ordinary paint, it will kill the stain forever. After this stain-killer primer dries, you can paint over it with your ceiling paint and the stain will not come back to haunt you.

Aluminum Wiring?

It has been my experience as a home inspector for a client to call thinking they have aluminum wiring in their house and after further evaluation it is either proper aluminum wiring or copper wires that appear to be aluminum. A professional home inspector can evaluate the difference if the wire is visible at the time of the inspection.
Here is an example of a common question I have received:

The Client Wrote:
I recently purchased a mid-1940's home that has lots of charm and was well kept. It remains in excellent condition. After reading the Home Inspector’s report, I had some concern about the part that stated the presence of aluminum wiring. In addition, I was also informed that the wiring although appearing to be in good serviceable condition was not up to today’s standards, because it has “no grounds”. The Home Inspector also recommended that a licensed electrician evaluate the electric in the house. I know the house is old, but how much of a danger is this? Do I need an electrician? Is aluminum wiring a problem?
My Reply:

Based on what you told me, I don’t think you have aluminum wiring. Aluminum wiring did not come on the market until the early sixties, and when it did it was all three-wire (the third wire was a ground). Since you do not have a grounded system, I think what you have is two-wire rag romex. This wire is copper coated in nickel. When the inspector looked in the panel he saw the shiny ends of the wire and mistook them for aluminum. The best way of telling the difference is to look for the ground wire, or look at the romex cover. If the cover looks like cloth than it is the old romex. Aluminum wiring is only found with plastic covering.

All aluminum wiring is not bad, only the single strand aluminum found in the lighting and outlet circuits. This single-strand aluminum would get hot and shrink, then get hotter and would cause a fire. However, almost all modern houses use large stranded aluminum wires for service entrance cables and major appliance circuits. The large wires have many strands of wire and have a zero failure history.

Now about the two-wire system you have: although it’s adequate it does not offer the protection that the three-wire/grounded system offers. You do not have a big problem, but to be on the safe side have an electrician look at your system. He can install ground fault receptacles in the most used receptacles, such as the outside receptacles, and receptacles near sinks, this will make that two wire system safe. This is not very expensive and not very time consuming.
It is better to be safe than sorry.

Wednesday, September 17, 2008

Household Hazards


Do your part and know what do you do with leftover paint and their containers?

Paint constitutes about 60 percent of household hazardous waste collected by local and state governments. Latex paint is not considered hazardous by federal definition. So usable latex paint can be dried and discarded in the normal trash collection.

The National Paint and Coatings Association offer these suggestions for disposing of paint:

Buy only the paint you need — First, always buy only what you need. That way, you reduce the chance of having any paint leftover.

Store paint so it lasts for years — Just cover the opening with plastic wrap, and make sure the lid fits securely so the paint doesn’t leak. Then, store the paint can upside down. The paint will create a tight seal around the lid, keeping the paint fresh for years.

Use up all your paint — Leftover paint can be used on touch-up jobs and smaller projects. You also can blend and mix smaller quantities of similar colors of latex paint to use as a primer on larger jobs, or jobs where the final finish is not critical. (Always make sure you read and follow all label instructions when applying paint.)

Recycle the empty paint can — Once you’ve used up your paint, recycle the empty steel paint cans. Each paint can you recycle is one less can that ends up in a landfill! In some areas, plastic paint pails and containers also may be recyclable, so be sure to check the requirements for your community.


Donate or exchange your paint — If you just can’t use your leftover paint, donate it to community groups, theater groups, schools, churches and others who need or want it. You may even be able to take a tax deduction! Another good way to get rid of your unwanted leftover paint is to participate in — or organize — a neighbor-to-neighbor or community-wide paint exchange/paint swap. Some communities even hold these along with their household waste collection events.


Dispose of paint properly — If you need to dispose of leftover paint, make sure you do it properly. Let your leftover latex paint air-dry away from children and pets. Pour the latex paint into a paper box or bag and add absorbent material like shredded newspaper or kitty litter to speed drying. Recycle the empty can, and then throw the dried paint away with your normal trash. (Note: If you live in California, Washington or Minnesota, your state may require special disposal considerations for latex-based paints, so be sure to check.)

Remember, air-drying liquid solvent-based paint is generally not recommended, but if the paint has already solidified in a closed can, you can dispose of it in the regular trash. Liquid solvent-based paint should not be discarded with normal trash. You should save it for a household hazardous waste collection program in your community. Many municipalities provide household hazardous waste service, which is applicable for solvent-based paint.

Recycled steel paint cans, aerosol cans, automobiles, steel construction materials, and many other steel products end up in new steel products. Most all of today’s steel products contain recycled steel, and can be recycled again. Steel’s magnetic attraction allows steel products to be easily separated from other recyclables.

Recycling is good for the Earth and good for future generations. Many communities have curbside recycling services. Also there are recycling centers all across the country where items can be brought. A lot of recycling centers will pay you for dropping off recyclable goods.

The Steel Recycling Institute (SRI) plays a big part in the education of the economic and environmental benefits of recycling steel. For additional information about steel recycling, go to the SRI’s website at http://www.recycle-steel.org/

Friday, September 12, 2008

How did You Get in?


Home inspectors love to go into crawl spaces and sometimes they find new friends there, like Vic’s uncle did in an earlier blog. But what they don’t want to find is moisture or water intrusion. Collecting moisture in the crawlspace can cause wood rot of the floor joist, sill plates, main carry beams, not to mention mold and mildew. Moisture can build up in a crawlspace as a result of poor ventilation, a lack of a moisture barrier, ground water, or plumbing leaks. The foundation wall is water proofed on the exterior to prevent water from coming in to the crawl space. But the problem home inspectors have is that the water-proofing is below grade and cannot be seen. When a home inspector finds a damp or wet crawlspace they try to determine the source of the water intrusion, this is not always easy. But “Sculley and Mulder” had no trouble finding at least one source of water intrusion in this foundation. This picture is another good reason to hire a home inspector to do an in-progress inspection when you are building your new home. With an in-progress inspection the exterior of the foundation would have been inspected before the foundation was back-filled for proper water proofing and workmanship, and would have prevented problems like you see in this picture.

Thanks again to” Sculley and Mulder”

Thursday, September 11, 2008

What We See


The two types of engineered floor joist we see most in newer homes are; TGIs (ply-beam) and open web trusses. TGI has become a generic name for all wooden I beam joist, but the specifications vary from manufacture to manufacture. The open web truss joist are a wooden version of the steel bar joist used in commercial buildings. The open web truss system makes it easier to run pipe, ducts, electric and whatever trough it, because of its open design. However the open web truss design makes it difficult to adjust the length in the field.
The TGI joist is a solid I-beam design and this makes it harder to run pipe, ducts, electric, and whatever trough them. But the solid I-beam design makes it easy to adjust the length in the field. But the key thing to look for when inspecting any engineered joist is any modifications that have been made to them.

These open web truss pictures are courtesy of "Sculley and Mulder".

Wednesday, September 10, 2008

Darwin's Home Inspections

As a home inspector instructor, I am always talking about the evolution of building materials and construction methods. Most home inspectors inspect homes that range from seven to ten decades of this “evolution of building materials and construction methods”, and some even more. This evolution has not stopped and probably will not. Each decade of new homes have something new, either in framing members, trusses, cladding, plumbing, electrical, windows, to name a few. I still remember the first time I saw a TGI joist; I was building a fire house that was designed so the second floor floor- joist would span the full width of the garage floor without using support post. This building was designed to use a TGI joist to make this long span.
For a long time conventional lumber was used in all parts of framing, now there are all different kinds of engineered trusses and joists. There are TGI joist, open-web joist, and even a hybrid joist that consists of wood and steel. Prefab products are coming out that can be easily adjusted in the field, this is a big help when dealing with engineered building material.
As home inspectors we need to keep up with our knowledge of past and present building materials and construction methods and everything in between. We must evolve with the construction industry.
Tune in tomorrow for more on open-web joist.
Please log a comment if there are any topics you would like to have discussed.

Tuesday, September 9, 2008

Don't Leave Me Hanging


Back in the day houses were built with conventional lumber, and conventional framing construction. Now engineered trusses for roofs, TGI joist for floors, truss joist, and many other engineered framing components are normal for house construction. The main thing about engineered components is that they have been designed not to be modified in the field. Some modifications are allowed by some manufactures, but the modifications can only be made to their specifications. As a home inspector it is common to find engineered components cut and modified for heat and air ducts, plumbing pipes, and a number of other reasons. It is hard for a home inspector to determine if modifications are done to manufactures standards. As a home inspector we have to report any modifications we find during our inspection as no-standard construction. There are open web trusses designed for joist that can be shortened in the field, but again there is a correct way and a wrong way to make this modification.

This is a picture of truss joist that have been modified. I will share more information on engineered components tomorrow.